Shot
#
|
Shot Description
(Char, Props, BGs, Action, FX)
|
List of Elements / Assets
COMPLETED
|
List of Elements / Assets
NEEDED
|
Other Notes
(including
additional things IF you have
time)
|
1
|
Opening
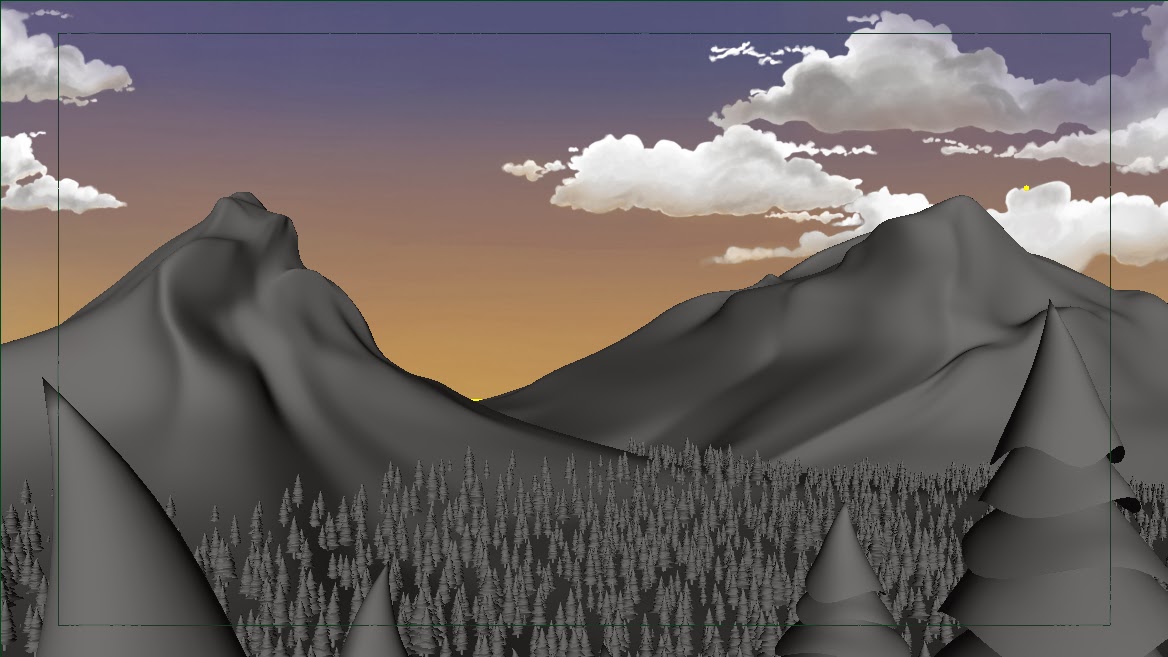
shot, forested mountains and sunset with rays of light and particles.
|
Modeling
finished: forest, mountains, sun.
Sky/BG
painted.
Staging
finished.
Blocked
animation.
|
More
rays of light.
Particles
and Lighting.
Adjustments
to bg.
Texturing.
Sound
adjustments.
More
animation.
|
Repair
any penetrating geometry in the forest.
Environment
Fog.
|
2
|
Character
close up as Ray comes to life.
|
BG
painted.
Blocked
animation.
Staging
done.
|
Character
animation.
Particles.
Adjust
BG painting.
Adjust
texture.
Sound.
|
Add
more elements in background.
Consider
camera shake.
|
3
|
Ray
travels toward the city past a coastline and lighthouse.
|
Modeling
character and lighthouse done.
BG
painting done.
Staging
done.
|
Character
animation.
Particles.
Add
more foliage to cliffs.
Water
and Water effects.
Texturing.
Lighting.
Sound.
|
Adjust
BG painting.
Add
more elements in background.
Consider
camera shake.
Environment
Fog.
|
4
|
Ray
sees street lights as they get lit up by the other rays of light.
|
Models
finished.
Blocked
Animation.
Staging
done.
|
Character
animation.
Particles.
Lighting.
Textures.
Sound.
Add
more objects in BG.
BG
painting.
|
Add
more geo to background.
Consider
camera shake.
Fix
Sidewalk.
|
5
|
Ray
tries to light up the street lights himself but is beaten to the punch.
|
Modeling
finished.
Staging
finished.
Blocked
Animation.
|
Character
Animation.
Particles.
Lighting.
Textures.
Sound.
Add
more objects in BG.
BG
Painting.
|
Add
more geo to background.
Consider
camera shake.
|
6
|
Ray
tried one more time but the light turns on by itself.
|
Modeling
finished.
Staging
done.
Blocked
Animation.
|
Character
Animation.
Particles.
Lighting.
Textures.
Sound
(electric light).
Add
more BG objects.
BG
painting.
|
Remember
to make electric light green and add sound.
Fix
sidewalk.
Consider
camera shake.
|
7
|
Ray
sees traffic light.
|
Modeling
finished.
Blocked
Animation.
Staging
done.
|
Character
Animation.
Add
BG painting.
Lighting.
Textures.
Sound.
Particles.
|
Consider
adding geo in the BG.
Consider
camera shake.
|
8
|
Ray
misses the green light.
|
Modeling
done.
Blocked
Animation.
Staging.
|
Character
Animation.
Lighting.
Textures.
Sound.
Particles.
BG
painting.
|
Consider
geo in background.
Consider
camera shake.
|
9
|
Street
scene where Ray tries to light up a car headlight but is blasted by the light
instead.
|
Modeling
done.
Background
done.
Staging.
Blocked
Animation.
|
Texturing.
Lighting.
Sound.
Particles.
Character
Animation.
|
Make
sure no BG matte painting is needed.
Consider
camera shake.
|
10
|
Church
scene, where Ray is beaten to votive candles by his brethren.
|
Modeling
done.
Blocked
Animation.
|
Staging
adjustments.
Character
Animation.
Lighting.
Texturing.
Sound.
Particles.
|
Consider
adding more candles in background for lighting.
Consider
camera shake.
|
11
|
Office
Scene where Ray sees the desk lamp but it flickers on and he gets frustrated
and throws it off the desk.
|
Modeling
done.
Blocked
Animation.
|
Character
Animation.
Lighting.
Textures.
Sound.
Particles.
Staging.
|
Use
particles as sparks to show frustration.
Consider
camera shake.
|
12
|
Diner
Sign scene
|
Modeling
Done.
Blocked
Animation.
|
Character
Animation.
Lighting.
Textures.
Sound.
Particles.
BG
element.
|
Consider
building of some kind in BG.
Consider
camera shake.
Fewer
particles now.
|
13
|
House
scene, where Ray is trying to light a candle.
|
Modeling
Done.
Blocked
Animation.
|
Staging.
Character
Animation.
Lighting.
Textures.
Sound.
Particles.
BG
Sky (darker)
|
Consider
camera shake.
Consider
adding sparks as he hits the glass.
|
14
|
Theater
Marquee scene.
|
Modeling
done.
Blocked
animation.
|
Staging
(add building)
Character
Animation.
Lighting.
Texturing.
Sound.
Particles.
BG
element.
|
Remember
to animate lights.
Consider
camera shake.
Fewer
particles still.
Darker
sky/environment.
|
15
|
Ray
runs into a guard in an alley with a flashlight.
|
Modeling
done.
Blocked
Animation.
Staging.
|
Character
Animation.
Guard
Animation.
Lighting.
Textures.
Sound.
Particles.
Posters.
|
Fix
rig on guard if possible.
Fewer
to no particles.
Darker
still.
Consider
camera shake.
|
16
|
Bug
Zapper gets Ray.
|
Modeling
done.
Staging
done.
Blocked
Animation.
|
Sky
BG (very dark)
Lighting.
Texturing.
Character
Animation.
Sound.
Sparks
effect (zapper).
|
Keep
Ray at the same point in the start of this scene as where he ended in the
previous shot (transition).
Consider
camera shake.
Darkest
here.
No
particles from Ray here.
Ray
flickers.
|
17
|
Ray
travels by the coast and sees the lighthouse.
|
Staging.
Blocked
Animation.
|
Sky
BG.
Lighting.
Textures.
Character
Animation.
Sound.
Water
Effects and Water.
|
Figure
out the water here.
Consider
camera shake.
No
particles from Ray here.
Ray
is dim and flickers.
Environment
Fog.
|
18
|
Ray
flies up the side of the lighthouse.
|
Staging.
Blocked
Animation.
Modeling
done.
|
Sky
BG.
Lighting.
Textures.
Character
Animation.
Sound.
|
No
effects here.
Consider
camera shake.
Ray
is dim and flickers.
|
19
|
Ray
looks around and cautiously goes inside the broken glass.
|
Staging.
Blocked
Animation.
|
Broken
Glass needed.
Lighting.
Textures.
Sound.
Character
Animation.
BG
Sky.
|
No
effects.
Consider
camera shake.
Figure
out broken glass.
Ray
is dim and flickers.
|
20
|
Shot
of the lighthouse as Ray’s light slowly dims down to nothing and the scene
darkens drastically before a single flash of light emits from the lighthouse.
|
Staging.
Modeling.
|
BG
Sky.
Lighting.
Textures.
Sound.
|
No
effects.
Consider
camera shake.
|
21
|
Final
shot as the lighthouse lights up and illuminated the dark cold environment
with a bright warm light.
|
Staging.
Modeling.
|
BG
Sky
Water
and Water Effects.
Lighting.
Textures.
Sound.
|
Environment
Fog.
Consider
camera shake.
|

Wednesday, January 22, 2014
Breakdown sheet

Monday, January 13, 2014
Last Light, Winter 2014

Set in the 1950's along an American coast line, the sun sets, and the last ray of sunlight flies out. While competing against his fellow rays of light as well as electric bulbs, the last ray must look for a place to stay and light up for the night. This 3D animated short will be using complex shading and lighting in a stylized world while featuring a simple piano soundtrack with environment sound effects.
Thanks for taking a look at my blog for my film. This is the beginning of a new year, and a new quarter. The goals for this quarter are to complete the rigging, animation, and texturing, and to start on lighting and continue with the sound and the matte paintings in the background. I also plan to complete several style sheets to really nail down the final aesthetic of the film. I have a few new objects to place into the various scenes to help populate the environment, which should be done this week. I've also brought on some more people to help with the film, including Eric who will help me later on with the particle effects.
Another change on my blog you will notice is that the animatic will now have a password attached to it. I apologize to anyone who wanted to see this, but my goal in the next few months is to start making my rounds in various film festivals. So keep an eye open. I will post more as the project progresses.
Wednesday, November 20, 2013
Final 3D Animatic This Year
This is going to be a big update. I have been very busy with this film, working on everything from modeling to basic animation to character rigging and more. I plan to do more work to prepare for the final animation and lighting over the winter break, but this will be the last update to my animatic this year. I would like to thank everyone involved so far in this film this quarter, including Michelle Ionescu, who has been helping me with the design, modeling, and sound; Raymond McCoy-Sanders, who helped with modeling so far; Dennis McCoy, who also helped with modeling; China Nadeau, who made my beautiful backgrounds; Nora Graven for helping with rigging my character; and my professor, Mathew Maloney, who has been giving me great feedback and ideas to make this a much stronger film.
There is still a LOT of work to do. Next quarter I am going to focus on getting all the rigging finalized, getting the animation finished, getting as many of the backgrounds finished as I can, and finish as much texturing as I can, as well as starting preliminary lighting. Over the break I am going to work on some minor fixes and tweaks and getting feedback.
I can't promise I will have another update to the blog this year, but I will make sure to keep any significant updates posted here.
Monday, November 18, 2013
Forest update
Several quarters ago I built a MEL script (Maya scripting language) that I called "Populate". The point of this code was to allow you to select as many geometry files as you wanted to and then populate an object (plane with terrain) with as many of them as you wanted and without any interpenetration of the objects while attaching them to the surface and allowing you to randomize the rotation and scale (uniformly, diameter and height, or all 3 axes) allowing you to determine the range for each of these. It was not completely finished, and suffered from one or two bugs. However, I managed to figure out the solution to these issues even though I didn't have the time to implement the changes.
The reason I built this script was so I could use it in my final project, to build a forest while keeping the width and depth of the trees the same while randomizing the scales and placement of the trees. It worked pretty well, but in the end, one of the bugs I was running into was taking too much time to fix, so I explored some other tools in Maya, and found the Paint Geometry tool. This is a really cool tool that does something very similar to my script, while also allowing you to go back and make changes to your objects live, adjusting the scales or removing objects on the fly. While I still want to complete my script because it has a few advantages over this tool (mainly the ability to decide how many objects you want, avoid colliding geometry, and scaling x and z together), but for now I decided to try this tool out build my forest.
So far it seems to work well. After looking at some pine forest reference images, I have decided to make my forest rather dense, which means a lot of geometry. As such, even though each tree is a low polygon count, the scene bogs down my system drastically whenever the forest is visible. I am planning to look into using a renderman rib archive to speed this up, if possible, but only if the computers can handle exporting the objects into a new file and then into a rib archive.
I also now have to go through this scene during the break and decide if I need to remove any interpenetrating trees or if it would be easier to fix my script and redo this. I am pleased with the look right now, but if anyone knows a better way of creating a forest with my own geometry, I am open to suggestions.

The reason I built this script was so I could use it in my final project, to build a forest while keeping the width and depth of the trees the same while randomizing the scales and placement of the trees. It worked pretty well, but in the end, one of the bugs I was running into was taking too much time to fix, so I explored some other tools in Maya, and found the Paint Geometry tool. This is a really cool tool that does something very similar to my script, while also allowing you to go back and make changes to your objects live, adjusting the scales or removing objects on the fly. While I still want to complete my script because it has a few advantages over this tool (mainly the ability to decide how many objects you want, avoid colliding geometry, and scaling x and z together), but for now I decided to try this tool out build my forest.
So far it seems to work well. After looking at some pine forest reference images, I have decided to make my forest rather dense, which means a lot of geometry. As such, even though each tree is a low polygon count, the scene bogs down my system drastically whenever the forest is visible. I am planning to look into using a renderman rib archive to speed this up, if possible, but only if the computers can handle exporting the objects into a new file and then into a rib archive.
I also now have to go through this scene during the break and decide if I need to remove any interpenetrating trees or if it would be easier to fix my script and redo this. I am pleased with the look right now, but if anyone knows a better way of creating a forest with my own geometry, I am open to suggestions.
Subscribe to:
Posts (Atom)